
All right, you’ve successfully gone through the Ideation Phase, and after careful evaluation, you’ve now selected a use case for application development. It’s time to gather the (detailed) requirements and validate the solution with application end-user representatives and stakeholders.
During the Ideation Phase, the focus was on collecting business requirements, whereas the Validation Phase entails gathering application requirements, commonly referred to as ‘scoping’ activities. It's the stage where the proposed use case undergoes close inspection to ensure that it aligns with the needs and objectives of stakeholders before moving forward into application development. The amount of scoping and validation depends on how complex and risky the project is versus the skills needed to make it happen. Let me start by explaining some key concepts.
User Stories and Acceptance Criteria
A user story is a concise, informal description of a feature or requirement from the perspective of an end user. It's a way for development teams to capture and communicate what needs to be built into a software project in a simple and understandable format.
Typically, a user story follows a specific template: "As a [type of user], I want [some goal] so that [some reason]."
For example: "As a website visitor, I want to be able to create an account so that I can access exclusive content."
User stories are intentionally brief and high-level, serving as placeholders for conversations between the development team and stakeholders. They provide context and direction for the development process without prescribing specific technical solutions. User stories are given more detail by acceptance criteria, which are specific conditions or requirements that must be met for a user story to be considered complete and satisfactory. They outline the functional and non-functional expectations of the feature or functionality described in the user story. Clear acceptance criteria help minimize misunderstandings and ensure that the delivered product meets the desired quality standards.
To give you an idea of acceptance criteria for the user story example, it would look something like this:
User Registration Form (Functional Requirement):
- The website should have a registration form with fields for the user's name, email address, and password.
- The registration form should include the following validation for the email address format: minimum 2 characters@minimum 2 characters.domain extension.
Performance (Non-Functional Requirement):
- The registration and account activation processes should be completed within 30 seconds.
- The login process should have a response time of less than 2 seconds.
When brainstorming innovative ideas during the Ideation phase, you’ve already identified a potential workflow. There are various ways to turn that workflow, as well as user stories, into a visual user journey:
- Storyboarding: Collaboratively working out user journey sketches on a (digital) whiteboard.
- UI Mock-up: Static screen designs that give an impression of the look and feel of the application.
- Wireframe: Visualizes the user journey of the application by focusing on the functional components and where to place them on the pages, rather than being distracted by visual feedback.
- Prototype: An early version of the application that contains working functions and is used to test the UI in action, as well as to analyze the effect on the user.
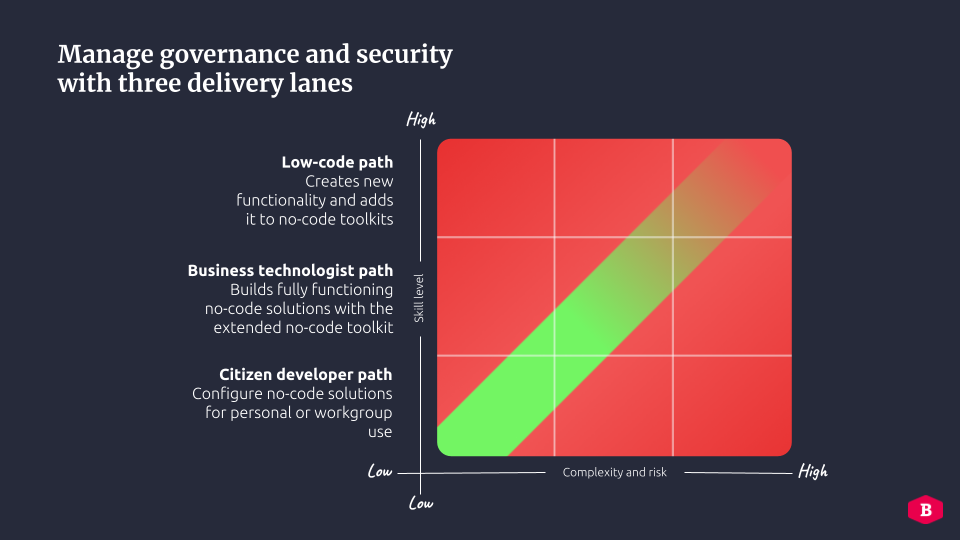
Determine the appropriate delivery path
Step 1 is all about figuring out the right way to go based on the different types of developer personas as part of Betty Blocks’ Citizen Development vision. The level of complexity and risks involved in your use case will determine the appropriate delivery path. Here are some key considerations to determine complexity and risks.
Complexity:
- User Interaction: The complexity of user interactions and interfaces required by the use case.
- Functionality: The number and complexity of functions or (custom coded) features the use case demands.
- Data: Analyze the complexity and the size of data structures, sources, and flows involved in the use case.
- Integration(s): The level of integration(s) required with other systems, APIs, or services.
- Business Logic: Understanding the sophistication of the business rules and logic embedded within the use case.
- Non-Functional Requirements: Considering non-functional requirements such as performance, scalability, security, and usability, which can add layers of complexity.
Risks:
- Security: Potential breaches of confidentiality, data loss, and uncontrolled user access.
- Business criticality: If the application fails, can the business function continue to operate?
- IT Architecture: Rules to build, modify, and interface IT resources.
- Regulatory: External laws, industry standards, or compliance requirements.
- Reputational: Potential loss of brand perception, social capital, or market share.
- Financial: Potential impact on revenue.
This image perfectly illustrates the sweet spot of use cases fit for Citizen Development.
So, what are the key differences between those delivery paths? Let me break it down for you.
The Citizen Developer path
A Citizen Developer is a business user with expertise in his/her business domain. They’re natural problem solvers looking for ways to improve their way of working with digital solutions with as little effort as possible. A Citizen Developer mostly works from pre-defined no-code templates built on a low-code platform and configures them to his/her needs.
Complexity of the use case: Low, pre-defined templates have restricted (governed) configuration options.
Required skills: basic platform introduction on how to configure templates and business logic knowledge.
Scoping activities: As the template usually covers 90% of the requirements in terms of design and functionality, listing down the business requirements for the remaining 10% is sufficient. It is far more efficient for a Citizen Developer to simply start configuring rather than spending too much time gathering requirements of functionalities that are easily built.
The Business Technologist path
A Business Technologist is a tech-savvy business user dedicated to streamlining and automating business processes, improving efficiency, and reducing manual workload. The Business Technologist closes the gap between the business and IT by creating no-code solutions that address the unique needs and challenges by translating creative business concepts into practical applications.
Complexity: Low - Medium
Low: The application is not available in a template and must be built from scratch. However, it has multiple reusable components, allowing a Business Technologist to deliver the application rapidly.
Medium: The application must be built from scratch and requires advanced business logic workflows and/or integrations with other systems.
Required skills: Advanced low-code skills and business logic knowledge.
Scoping activities: Several deep dive sessions, also referred to as ‘Refinements,’ are conducted to capture the user stories, acceptance criteria, and user journeys, which are translated into wireframes.
The Low-Code path
A Low Coder is a professional software developer skilled in coding. They use their skills to extend low-code platforms by customizing components, interfaces, data sources, and actions, which can then be reused by the entire company and/or built into highly complex applications.
Complexity: High
The application has to be built from scratch and requires highly advanced business logic workflows, integrations with other systems, and customizations in code.
Required skills: mastery of different coding languages as well as advanced data modeling.
Scoping activities: several refinements to capture the user stories, acceptance criteria, and user journeys, which are translated into a prototype. Technical research in order to determine the viability of the use case is conducted through a Proof of Concept.
User Story Mapping
Now that you’ve determined the appropriate delivery path, it’s time to gather the user stories. My advice would be to go with user story mapping. It’s a technique used in software development to describe and prioritize the features or functionalities of a product from the perspective of its users. It helps teams understand the user's journey through the product and ensures that the development process aligns with the user's needs and goals.
Identify user activities: The team starts by refining the business requirements captured in the Solution Value Board. They then list all the activities that each user might perform within the product.
Create user stories: For each activity identified, the team creates user stories. It is highly recommended that these be added and managed in software tools such as Jira. Use the INVEST method to map them:
- Independent: User stories should be self-contained and independent of each other, meaning they can be developed, tested, and delivered without relying on other stories.
- Negotiable: User stories should be open to discussion and negotiation between the development team and the stakeholders.
- Valuable: Each user story should deliver value to the end-user or customer. It should address a specific need or provide a meaningful benefit.
- Estimable: User stories should be clear and concise enough to allow the development team to estimate the effort required to implement them.
- Small: User stories should be small enough to be completed within a single iteration or sprint. They should focus on delivering a small, manageable piece of functionality that can be implemented and tested within a short timeframe.
- Testable: User stories should be written in a way that allows their acceptance criteria to be easily defined and tested.
For medium to complex use cases, aim for quick and to-the-point refinements. It's better to do multiple rounds of iterations than to spend too long on creating user stories that might need changing after feedback.
Visualize the user journey
Map the user journey by arranging the user stories horizontally in the order they would typically occur. Determine the appropriate technique based on the chosen delivery path. This creates a timeline or sequence of user interactions with the product.
The crucial part is validating with end users and relevant stakeholders. Show them visualizations of the use case and gather their feedback. This not only wins support but also helps spot any overlooked factors. Visualizations help to ensure that everyone has the same and correct understanding of the intended outcome and if it accurately represents their requirements. I've observed projects fail because this step is often overlooked, with the assumption that it consumes too much time. However, the reality is quite the opposite. The expense of rework due to misunderstandings far exceeds the initial investment in validation. It's during this crucial phase that the groundwork for future adoption is established.
Update the user story map
Use the feedback collected from end users and stakeholders to revise the user story map. You may add new user stories and remove outdated ones. After validation, incorporate acceptance criteria into the user stories. Continuously translate feedback into new or updated visualizations, iterating until you've defined the scope of the Minimum Viable Product (MVP).
Finalize the business case, get the green light
Final step! Wrap up your business case by incorporating a project quotation that considers estimated costs of user stories, necessary skills and resource availability for application delivery, and projected maintenance costs and efforts. Calculate Return on Investment (ROI) and identify relevant metrics for monitoring progress and value. Following approval of your business case, secure management commitment to assemble your team and start the project!
Did you complete all the steps and get your green light? Congratulations, the Development phase is about to start! Interested in how to mitigate the most common development risks? Read my next article.
