
Web services come in just about every shape, function, and size that you could imagine. From sprawling databases to interactive integrations (web services) like Google Maps. Fortunately for us, connecting any integration in the Betty Blocks platform follows the same basic steps for all of them. For our example, we’re using JSONPlaceHolder so we can show you the ropes.
.jpg?width=750&name=900x506-PaulBlog%20(1).jpg)
What's a web service?
Chances are that you've used hundreds of web services without really noticing them. Integrations simply allow an application to access data from from another application for their own purposes (also called an API connection). A common example would be payment services (like PayPal or WePay) in online shopping applications. The online shop doesn't own the rights to PayPal or the data transfer but with an integration they are able to implement it on their site.
Not only does this save companies the hassle of building brand new functionality into their website, it gives their end-users access to tons of handy features.
Your first web service
In order to connect a web service with your custom application, you only really need to do two things. Define the web service and create an endpoint. Basically, we start off the process by telling our application which integration we want to connect to, where it’s hosted, and what type of data will be received.
Don’t panic if you’ve never heard these terms before! Most integrations will provide all the information you need on their website. Once you’ve done it a couple of times then it will be just like riding a bike.
Getting back on track…
Step 1: Define the web service
Before you can start putting web services all over your front-end, we need to prepare the groundwork in your Back Office. With Betty Blocks you don't need to worry about coding any of these foundations though. All you need to do is fill in the relevant information into a form and you're done. The main things here are the Name, Host, and Content-type.
Here are the details for JSONPlaceHolder if you want to follow along in your own application:
- Name: JSONPlaceHolder API
- Protocol: HTTPS
- Host: jsonplaceholder.typicode.com
- Authentication Type: None
- Request Content-Type: JSON
- Response Content-Type: JSON
- Headers: None
- Help text: -
The Host is just like a web address where your application will retrieve the information from. Our example uses JSON as the content-type which tells your application exactly how to ready what's delivered. Content-types may vary depending on the web service you’re using but JSON is one of the more commonly seen.
With that done you've already finished connecting your first web service! Well… it’s connected to your application but doesn’t do anything useful yet. So let’s fix that.
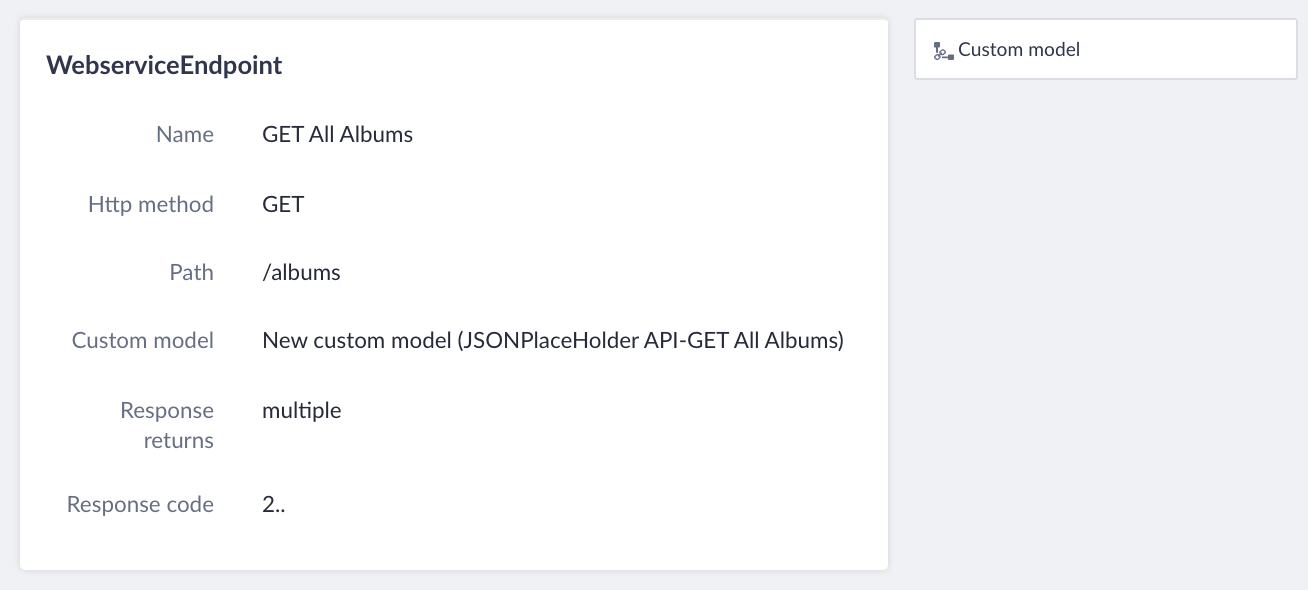
Step 2: Create an endpoint
Next up is letting your application know where to fetch the data from. Why do we need to do that? Simply put, web services can be massive databases while you're only interested in specific information. So our endpoint is quite simply a URL within the integration and a humble request for data (ala Oliver Twist).
Again, all you need to do when creating an endpoint is to fill in correct information. Since we’re requesting data, the type will be ‘GET’. Name the endpoint as something you’ll be able to recall because you may have multiple requests from the same integration further down the line.
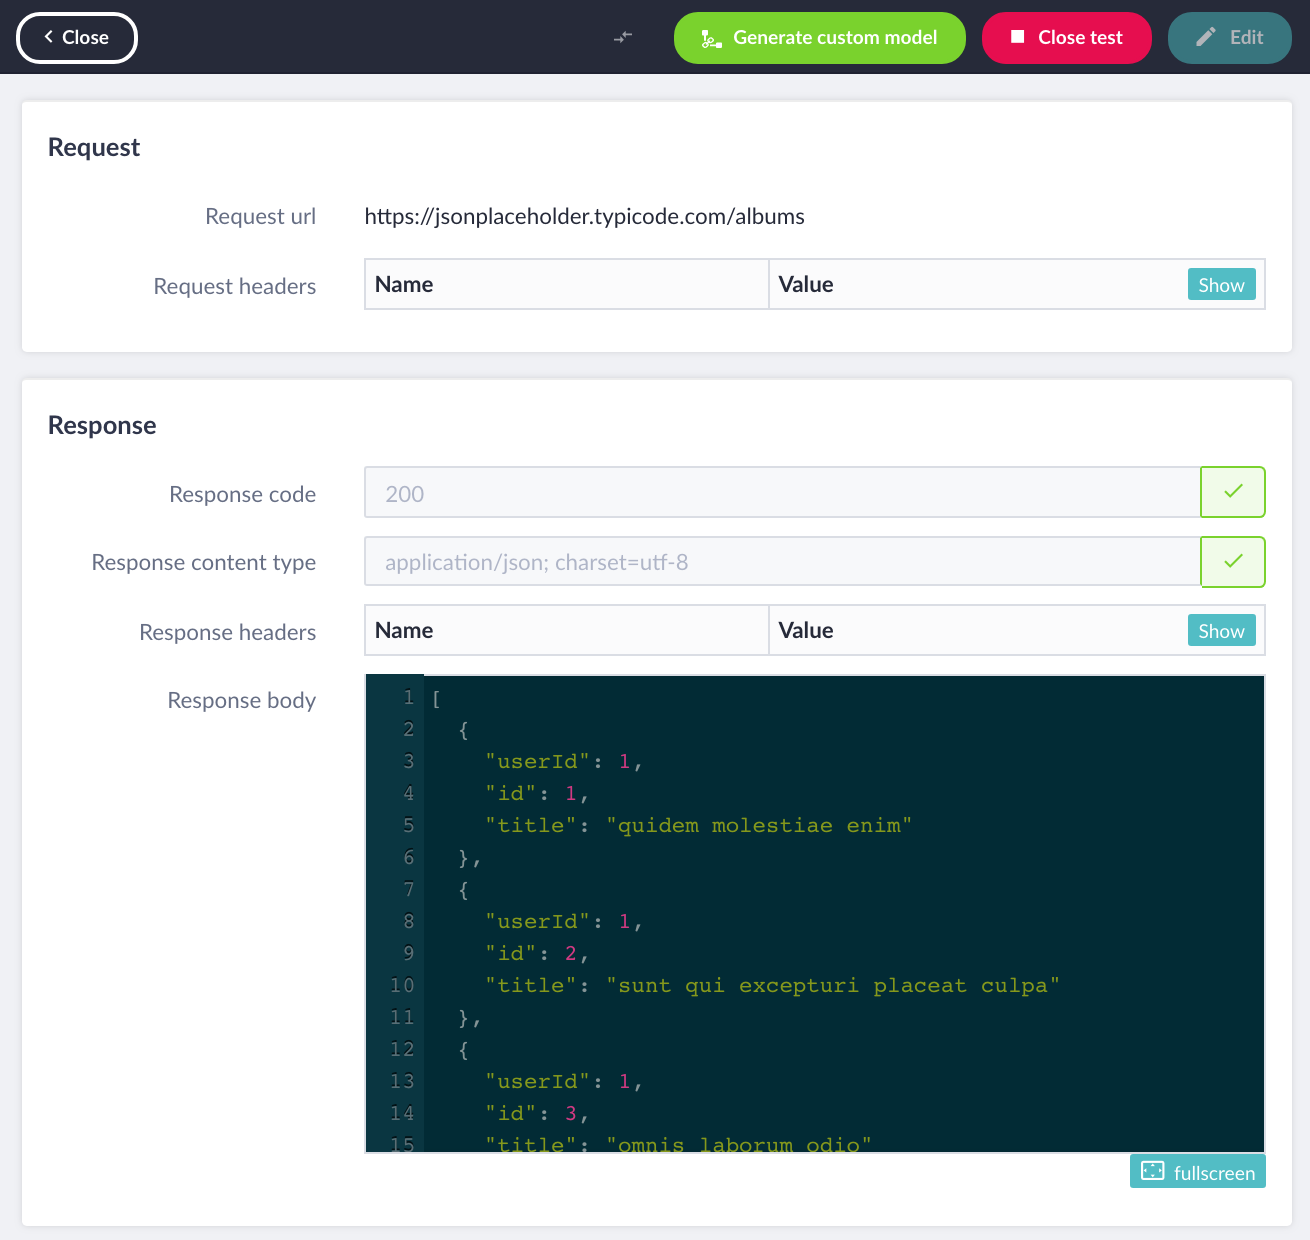
Step 3: Give it a test
Nothing makes a developer happier than error-free application components. So let’s give your new integration a quick test to make sure everything is working as intended. Click on ‘Run test’ and the platform will automatically send out a request and try to collect some tasty data.
We’re looking for 4 things here:
- The Request URL at the top is the full URL (Host + Path), which looks good.
- The Response code is 200, which means everything went according to plan.
- The Response content type says application/json; charset=utf-8 (for our example).
- The Response body contains the data we received from the Webservice, which also looks pretty good!
Ideally, your test run would look something like this:
Save that tasty data
You can generate a custom model based off of your first web service test instead of trying to create one manually or storing data in a cluster of separate variables. Each piece of data found in the web service is automatically assigned a variable type by the platform. This information can be re-assigned based on any specific needs your application has.
The advantage here is that when you’re trying to actually use this data for actions or user interface pages in the future, you only need to call one model instead of 10 individually created ones. Effectively saving you time and hassle when the time comes to use the data in any meaningful way. For a new developer, using the automatic custom models prevents input errors and makes web services much easier to implement on a large scale.
Note: You can setup a custom model manually if you want to store very specific pieces of data or add your own variables to the information received. In our example this isn’t necessary but feel free to go wild on your own applications. No testing is bad testing.
Re-use the winners
Even though the whole process is super fast (and no coding needed), you may find that a particular integration would work well in other applications you’re developing. So, instead of creating them from scratch again, our Block Store allows you to save and re-use web services along with all the connected parts.
Tip of the iceberg
Creating a web service within Betty Blocks takes just a couple minutes from start to finish. Now that you’ve got your custom data model ready it can be deployed anywhere you want. Our example contains album information but yours could be used to display event information, contact details, registrations, and so much more. As mentioned at the beginning of this article, the scope of integrations is massive with options for just about everything you could ever want for your users.
These first steps are just the beginning. If you want to learn how to really customize the requested data or the web service itself then you should check out the documentation page for an in-depth guide to web services and integrations.

